Wednesday, November 28, 2012

Set up Eclipse with Maven, Glassfish and Debug

Prerequisite:
  • Eclipse IDE for Java EE Developers Juno Release installed
Install SVN/Maven/Glassfish plugins:
  • Help -> Install New Software...
  • Install subclipse plugin (from: http://subclipse.tigris.org/update_1.8.x)

          (Notes: SVNkit setup instruction can be found here)
  • install Eclipse WTP plugin (from: http://download.eclipse.org/webtools/repository/juno)
  • install m2e - Maven Integration for Eclipse plugin (from: http://download.eclipse.org/technology/m2e/releases/)
  • install Maven Integration for WTP plugin (from: http://download.jboss.org/jbosstools/updates/m2eclipse-wtp/)
  • install GlassFish Application Server plugin (from: http://download.java.net/glassfish/eclipse/juno)

Maven build your project:
  • svn check out a project from your svn repository
  • in "Jave EE" perspective, "Project Explorer" window, right click on your project, "Configure -> Convert to Maven Project"
  • From the top menu, "Run -> run configurations...", add a few maven commands:
    • maven build (set goals as "package")
    • maven rebuild (set goals as "clean package")
    • maven clean (set goals as "clean")
  • Check "Skip Tests" if you don't want to run unit test when you do maven build on your local machine
  • Add maven command as "Run Favorites" in the "run" button: 
  • Select "mvn rebuild" from the green "run" button on the top tool bar to build your project
Set up Glassfish
  • Open Servers Window: Window -> Show View -> Servers
  • Right click in the severs window to add a new server
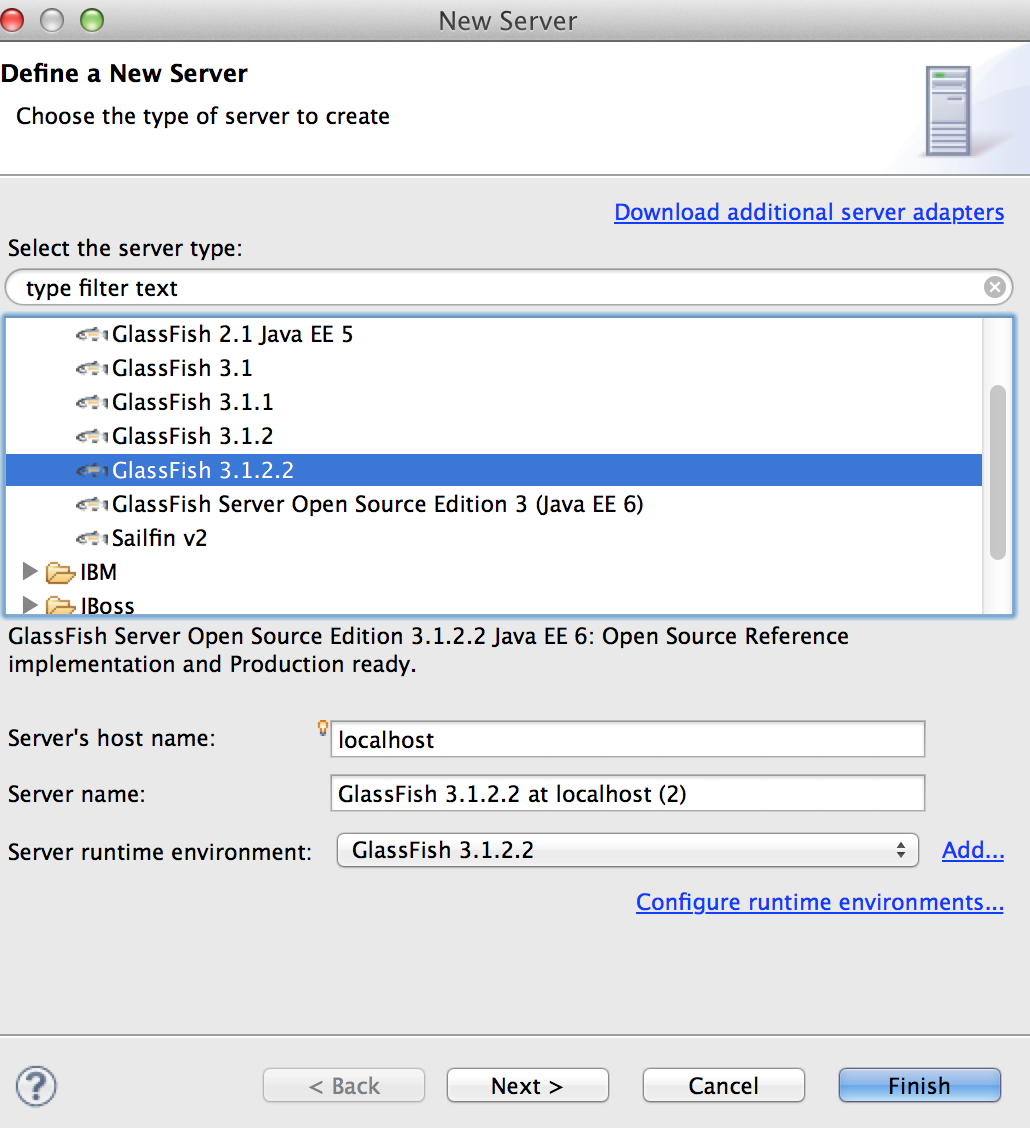
  • Choose a glassfish domain for the server


Deploy project on glassfish
  • in "Jave EE" perspective, "Project Explorer" window, right click on your project, "Run As -> Run on Server".
Setup debug

  • From top menu: Run -> Debug Configurations... -> Remote Java Application -> New
  • Make sure you put in the correct host name and glassfish debug port (in my case: localhost and 8099)
  • Click on "Debug" button to start debugging.

Friday, June 8, 2012

Associate new file type with Netbeans velocity editor plugin

I just installed Netbeans Velocity Editor plugin, by default it only supports *.vm and *.vsl file types. But we use *.vtl as velocity template in our projects.

To enable the velocity support for *.vtl file type, go to "Tools" -> "Options" -> "Miscellaneous" -> "Files", click "New ..." to add a new file extension, then select "text/x-velocity" for "Associated File Type (MIME)", click "Ok".

Netbeans 7.0.1 context menu (right click) very slow

For some reason the context menu of my Netbeans 7.0.1 was really really slow. Sometimes it took more than 30 seconds for it to show after I right click on a class or variable.

I tried to deactivate a few plugins: Restful service, SOAP service, Hibernate, etc according to my google search on the similar issue. But none of them worked.

Finally I decided to upgrade my Netbeans to the latest version of 7.1.2. And the problem is solved!


Thursday, April 12, 2012

Drupal site structure change couldn't be saved

We have a huge site structure in drupal 6. After we upgraded php 5.2.6 to 5.3.3, we got a fatal error when trying to access the site structure page:


Fatal error: Allowed memory size of 134217728 bytes exhausted (tried to allocate 82 bytes) in .....

So we have to put this line in %drupal_home%/sites/default/settings.php:

ini_set('memory_limit', '512M');

This increased the drupal memory limit from 128M bytes to 512M bytes. Now we can see the site structure page. However, when we tried to make some changes, the changes are not saved and no error on the web page. Then we found this warning in the apache error log:

[error] [client xxx.xxx.xxx.xxx] PHP Warning:  Unknown:
Input variables exceeded 1000. To increase the limit change max_input_vars in php.ini. in Unknown on line 0, referer: https://yoursite.com/menu-site-structure

So now we added this line to php.ini:

max_input_vars = 2000

This increased the max input variables from 1000 (default) to 2000, and this solved the problem.


Thursday, April 5, 2012

Debugging Drupal Source Code remotely in NetBeans

Configuring the Server:


1. Make sure PHP XDebug module is installed.
2. Add this section to your php.ini (i.e. /etc/php.ini).  NOTE: make sure you put IP address of the client machine (the debugging computer) for the "remote_host", not the the server IP!

; xdebug config
xdebug.remote_enable=on
xdebug.remote_host=%client IP address%
xdebug.remote_port=9000
xdebug.remote_log=/var/log/xdebug.log
xdebug.idekey=netbeans-xdebug

3. Restart Apache (i.e. $apachectl graceful).
4. Run php -info. And you should see something like this:

xdebug support => enabled
Version => 2.1.4
... 
DBGp - Common DeBuGger Protocol => $Revision: 1.145 $
...
xdebug.idekey => xxxxx => netbeans-xdebug
xdebug.remote_enable => On => On
xdebug.remote_handler => dbgp => dbgp
xdebug.remote_host => xxx.xxx.xx.xxx => xxx.xxx.xx.xxx
xdebug.remote_port => 9000 => 9000
...

Configuring the Client:

1. Make sure PHP plugin is installed for the NetBean.
2. Start NetBeans and create a new PHP project (File->New Project). Select PHP Application from Remote Server and click Next.
3. Give the project a name and local location and click Next.
4. Setup the Remote Connection as appropriate for your server and click Next. Click the "Manage" button the set the remote connection by putting in the username and password. If you use SSH to access the server, leave the password field blank but provide the private key file.
5. NetBeans will construct a list of files it will download. Click Finish to download the files.

Debugging Drupal Remotely:

1. Make sure you open the port for Netbeans if you use Windows 7 and Vista.
2. In Netbeans, set the drupal project as the main project, then go to "Debug Project".
3. Enjoy debugging.

Tuesday, November 8, 2011

Self InclusiveTemplating in JSF 2.0

Page template is a nice feature in JSF 2.0. Combined with EL 2.2, it is so powerful that you can do self inclusive templating in a production environment. Here is an example:

1) client file - index.xhtml:

    <ui:composition xmlns="http://www.w3.org/1999/xhtml"
         xmlns:ui="http://java.sun.com/jsf/facelets"
         xmlns:f="http://java.sun.com/jsf/core"
         xmlns:h="http://java.sun.com/jsf/html"
        
template="/templates/template.xhtml">

      
<ui:define name="title">Page Title</ui:define> 

       <ui:define name="body">Page Body</ui:define>
   </ui:composition>


Here it is using the template.xhtml as the template, then define 2 elements "title" and "body" to pass to template.xhtml.

2) template file - template.xhtml:

<!DOCTYPE html PUBLIC "-//W3C//DTD XHTML 1.0 Transitional//EN"
"http://www.w3.org/TR/xhtml1/DTD/xhtml1-transitional.dtd">
<html xmlns="http://www.w3.org/1999/xhtml"
      xmlns:h="http://java.sun.com/jsf/html"
      xmlns:ui="http://java.sun.com/jsf/facelets">
 

<h:head>
 <title><ui:insert name="title">Title</ui:insert></title>
 <ui:include src="/templates/header.xhtml"/> 

</h:head>
 

<h:body>
  <div id="col2" class="clearfix">

   <div id="col2a">
    <ui:insert name="body">Body</ui:insert>
    <ui:include src="/templates/footer.xhtml"/>
   </div>
 
   <div id="col2b">
    <div id="nav-container">
     <ul id="nav-main">
       <ui:include src="/templates/submenu.xhtml">
        <ui:param name="submenu" value="#{sessionSupport.menuService.getSubMenu(currentSectionUrl)}" />
        <ui:param name="level" value="1" />
      </ui:include>
     </ul>
    </div>
   </div>

  </div>
</h:body>
 

</html>


The two "ui:insert" are the place-holders for page title and body, which are provided from the client file (index.xhtml); "ui:include" pieces are convenient to include a few html snippets to make the code clean and neat. Among them submenu.xhtml is the most interesting one.


3) self inclusive snippet file - submenu.xhml:

<ui:composition xmlns="http://www.w3.org/1999/xhtml"
   xmlns:ui="http://java.sun.com/jsf/facelets"
   xmlns:h="http://java.sun.com/jsf/html"
   xmlns:c="http://java.sun.com/jsp/jstl/core">
 

<c:set var="url" value="#{sessionSupport.breadCrumbs[level+1].url}"/>
<c:set var="requestURI" value="#{sessionSupport.requestURI}" />

<c:forEach items="#{submenu}" var="menuItem" varStatus="status">

<c:choose>
<c:when test="#{sessionSupport.menuService.isSelf(menuItem, requestURI)}">
 <li class="active"><a href="#{menuItem.url}">#{menuItem.name}</a>
   <ul>
    <ui:include src="/templates/submenu.xhtml">
    <ui:param name="submenu" value="#{sessionSupport.getSubMenu(
url
)}"/>
    <ui:param name="level" value="#{level+1}" />
    </ui:include>
   </ul>
  </li>
</c:when>
<c:otherwise>
  <li><a href="#{menuItem.url}">#{menuItem.name}</a></li>
</c:otherwise>
</c:choose>
</c:forEach>


</ui:composition>


The code loops through the menu items at the current level and then calls itself, passing the sub-menu of the next level as a parameter, and then goes on and on, until it walks through the whole tree structure.

Setting up JSF 2.0 and EL 2.2 on Glassfish v2

I am migrating our JSF 1.1 application to JSF 2. Since we are still running Glassfish 2.1.1, I can't use the latest version of JSF (2.1.3), which targets Servlet 3.0 containers like Glassfish v3. So I settled with JSF 2.0. One of the nice features of JSF 2.0 is the build-in page templating support, which is a big help to clean up those messy jsp files.

While setting up the templates, I found that we need to pass parameters to methods in the jsf/xhtml file. But this is NOT supported by default in Glassfish 2.1.1. Comes EL 2.2 for the rescue.

It is kind of easy to set up JSF 2.0 and EL 2.2 on Glassfish v2:

1) Add el-impl-2.2.jar in your project pom.xml (assuming you use maven), which will install two jar files (el-impl-2.2.jar and el-api-2.2.jar) in your WEB-INF/lib after build:

    <dependency>
      <groupId>org.glassfish.web</groupId>
      <artifactId>el-impl</artifactId>
      <version>2.2</version>
    </dependency>

2) Copy el-impl-2.2.jar and el-api-2.2.jar to %Glassfish_Home%/lib/

3) Download jsf 2.0 from http://javaserverfaces.java.net/, then copy jsf-impl.jar and jsf-api.jar to %Glassfish_Home%/lib/

4) Add "classpath prefix" in glassfish domain configuration file domain.xml (or you can use the Admin console: Application Server -> JVM Settings -> Path Settings -> Classpath Prefix):

<java-config classpath-prefix="${com.sun.aas.installRoot}/lib/jsf-api.jar${path.separator}${com.sun.aas.installRoot}/lib/el-api-2.2.jar"
...


You are all set to roll!